
Developing on Microchip’s PIC24 Microcontrollers

I recently had the chance to explore firmware development opportunities for our embedded projects on Microchip’s PIC24 microcontrollers. Everyone knows how thrilled I usually am about the accessibility of Microchip technologies (user-friendliness, documentation, support and overall experience), and that is why I would like to share this short tutorial on handling development on PIC24 microcontrollers.
I purchased a Microstick development package available here: ProductDetails.aspx?PartNO=DM240013-2
Specifications
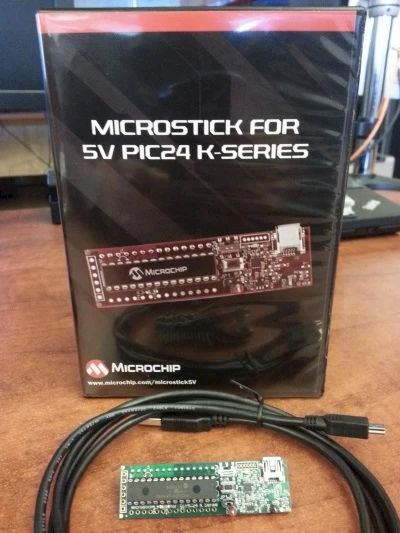
The Microstick for 5V PIC24 K-series microcontrollers is the perfect solution for those looking for an affordable, extremely portable and simple development platform. The USB powered package includes an integrated debugger/programmer, a DUT socket for easy device swapping, a LED user and a reset button. The package supports “KA” and “KM” 5V PIC24 microcontrollers.
The product comes in a beautiful storage box (similar to the box that comes with PC video games) and contains the following material:
- Microstick for 5V PIC24 K-series microcontrollers
- USB cable
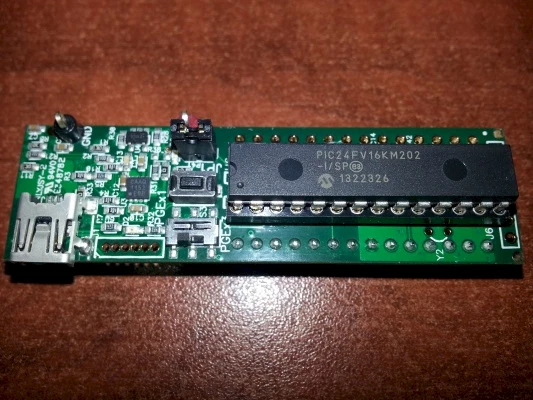
- PIC24FV16KM202 microcontroller (28-pin)
The Microstick supports the following “KA” and “KM” 28-pin SPDIP microcontrollers:
- PIC24FV16KM202 (included in package)
- PIC24FV08KM202
- PIC24FV16KM102
- PIC24FV08KM102
- PIC24FV32KA302
- PIC24FV16KA302
Details on PIC24FV16KM202 specifications and functionalities are available here: 30003030b.pdf
Installation and Preparation
The development package supports Microchip’s MPLAB Integrated Development Environment (IDE), which makes development quite simple and quick. The MPLAB IDE must be installed prior to using the 5V PIC24 Microstick. This board is designed to be compatible with the IDE’s 1.60 version or a more recent version. While the development environment provides assembly tools, most of the code can be written in C language and requires the installation of a compiler. Microchip’s MPLAB XC16 compiler can easily be integrated into the IDE.
The compiler and IDE are available free of charge for evaluation purposes. However, the compiler’s free version is limited to 60 days with the 01 optimization level. Once the 60 days are up, the compiler still works; however, optimization is deactivated, which means that the compiled code’s size may increase.
To download:
- MPLAB X IDE: www.microchip.com/mplabx
- MPLAB XC Compiler: www.microchip.com/xc16
For my part, I used MPLAB X IDE’s 2.20 version and MPLAB XC16 compiler’s 1.22 version. One interesting detail about developing on PIC24 (and Microchip in general) is that the development environment and the compiler run on Windows, 32- and 64-bit Linux and Mac OS X.
Demo Execution
Once downloading is completed and the IDE and compiler are installed, only a few steps are required to build, execute and debug a firmware. As part of this tutorial, we will simply use the example provided with the Microstick. Not surprisingly, the example is the standard embedded “Hello, world”: make the LED flash.
The demo code can be downloaded on Microchip’s “Microstick for 5V PIC24 K-Series” product page: PIC24FV16KM202%20demo.zip
1. Unzip the demo project in a folder of your choice.
2. Connect the Microstick to the computer using the USB cable.
3. Launch the IDE MPLAB X application.
4. Open the demo project (via File –> Open Project…). The folder should be called “pic24fv16km202_microstick_demo.X”.
5. Open the project properties (via File –> Project Properties…) and make sure that the right peripheral device is selected (Microchip Starter Kits –> Starter Kits (PKOB)).
6. Build, transfer and execute the Microstick’s demo application (via Debug -> Debug Project).
7. Put the JP1 jumper in place to activate the LED on the circuit in order to see the result.
Demo Code
As mentioned previously, the code in this example is quite simple. The goal is to get the LED to flash. If we focus solely on the body of the code, we get this:
int main(void)
{
    unsigned int i;

    TRISAbits.TRISA0 = 0;

    while(1)
    {
        for(i = 0; i < 65535; i++)
        {
            Nop();
            Nop();
            Nop();
            Nop();
        }
        LATAbits.LATA0 ^= 1;
    }
}
Result
If you follow the steps, you should see the LED flash regularly on the board, as shown in the picture below:
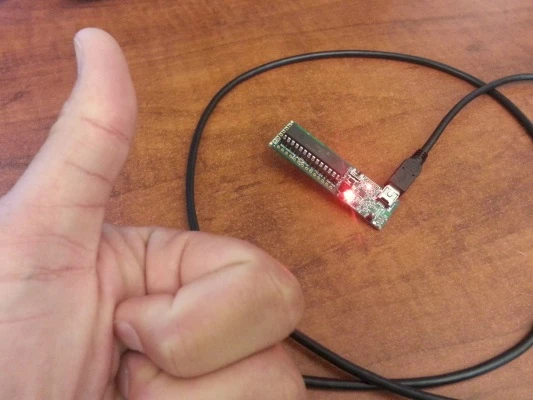
As Dave Jones would say: “Thumbs up!” or even “Beauty!” (www.eevblog.com).
Conclusion
We started with a description of the package content. We then went into more details about the functionalities of Microchip’s 5V PIC24 microcontrollers. We then proceeded with the demo code’s installation and execution before observing the result. The “Microstick for 5V PIC24 K-Series” development package is a low-cost and quick solution for 16-bit development on microcontrollers.