
Using Git in cPanel, the console way

While cPanel offers a Git Version Control feature, I have always preferred to have full control via a terminal window. It is actually very simple to integrate Git on such a server and this article describes the steps.
You will need:
- A Git repository (obviously);
- A terminal access via cPanel (sometimes you have to ask your host to unlock this feature);
- An empty public directory to push the code (usually public_html, but if it’s a subdomain, it will be public_html/subdomain.)
Step 1: Create or retrieve an SSH key
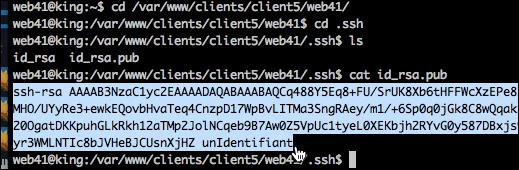
The SSH key identifies you to the Git repository. Usually, no key exists in a newly created hosting server. To check, open the cPanel terminal.

Type the following commands:
cd ~/.ssh
cat id_rsa.pub
You should get the message: no such file or directory.
Create a key by giving a meaningful identifier, e.g. “myblog”.
ssh-keygen -t rsa -C "myblog"
Once generated, read the key:
cat id_rsa.pub
A text will be displayed that you must copy in its entirety.
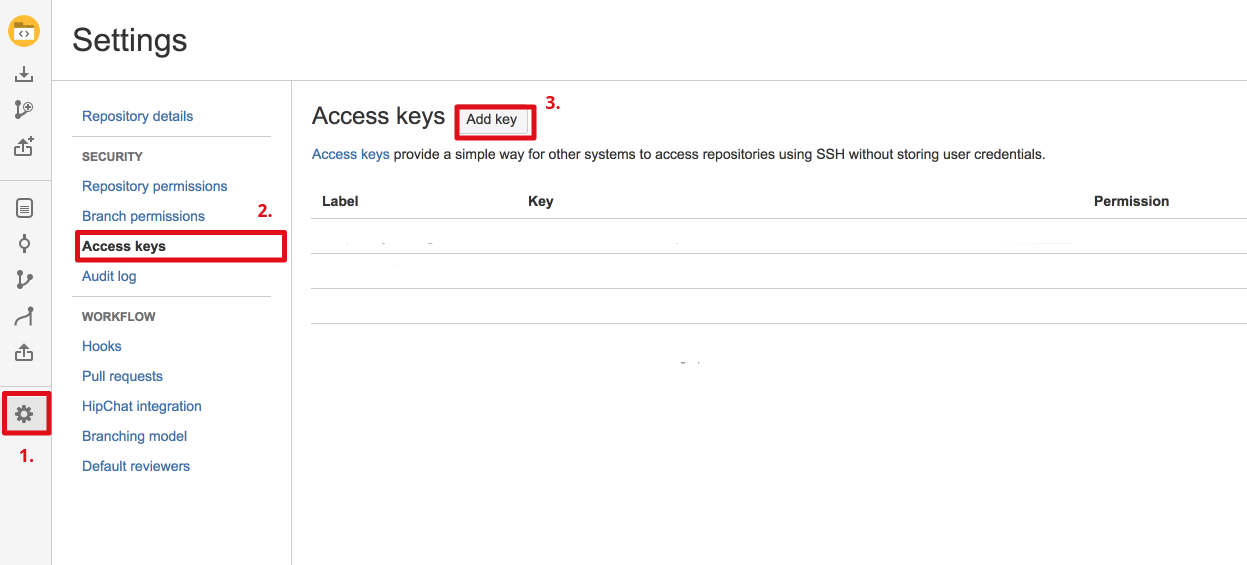
Step 2: Add the SSH key in the Git repository configuration
Now that we have the key, we can add it in the Git repository configuration. It is advisable to only add the read permission, as we don’t want the web server to be able to make commits/pushes to the repository.
Step 3: Initialize Git in the server and configure it
Return to the cPanel terminal.
At the prompt, type ls. If the repositories folder does not exist, create it: mkdir repositories. Then go into this folder: cd repositories.
Let’s assume that our project is myblog. Create the folder mkdir myblog. Go into this folder: cd myblog.
Initialize Git:
git init
You get something like: Initialized empty Git repository in /myblog .git/.
Connect the repository by replacing PATH/TO/REPO by the path provided in your Git project.
git remote add origin PATH/TO/REPO
Identify yourself even if you are not asked:
git config user.name "YOUR NAME"
git config user.email "YOUR E-MAIL ADDRESS"
Let’s run it!
git fetch
The content of the Git repository can now be retrieved.
If we were in a standard installation where the .git directory is in the same directory as the web directory, we would only do git pull origin master. However, we should remember that we installed the Git in /repositories/myblog and not in the public directory of our hosting, usually public_html.
So we should use this instead for our Git commands:
git --git-dir=/home/YOUR_ACCOUNT/repositories/myblog/.git --work-tree=/home/YOUR_ACCOUNT/public_html YOUR GIT COMMAND
This command is interpreted as follows:
git --git-dir=GIT/PATH --work-tree=PUBLIC/PATH YOUR COMMAND
This sounds tedious to write, but know that a terminal always remembers the commands you made in a previous session… Still, write down the initial command somewhere, just in case. Also, it’s possible to write this path in the configuration. However, I always prefer to see where things are going, so I’ll go with the command.
To finish our install, we just type:
git --git-dir=/home/YOUR_ACCOUNT/repositories/myblog/.git --work-tree=/home/YOUR_ACCOUNT/public_html pull origin master
Our code should now be in public_html while your Git is safely in the hidden repositories folder.
That’s it! You can now push your changes via the cPanel terminal. Don’t forget that the Git repository at your host is read-only. This is more secure. So, if you are working on a website like Wordpress or ProcessWire, don’t do any online updates (for example, changing the code with the cPanel file manager or the terminal), but opt instead for updates on your development serve — code that will then be pushed via Git to the online site.