
Using Amazon Simple Email Service

In the course of an internal project, I was charged with exploring Amazon’s email services. In this article, I’ll be sharing what I learned about the Amazon Simple Email Service (SES) features: sending, bounces, out-of-office messages, complaints, black-listing and virus scanning. Typically of many Amazon services, SES is both simple and complex.
One of the sources of SES’s complexity is the modular nature of Amazon cloud services. Since each Amazon Web Service (AWS) only does one thing, you need to assemble a pipeline of services to get better functionality. While it is possible to use SES by itself, it is awkward to do so, since all feedback is sent to the address that the emails originate from. To better control the feedback, you’ll need to sign up for a couple of other AWS services: Simple Notification Service (SNS) and Simple Queue Service (SQS). SNS is used to receive the feedback from SES, and SQS, to receive the notifications from SNS.
This is why we will be dealing with the following tools on AWS, the Amazon cloud:
- Simple Email Service (SES)
- Simple Notification Service (SNS)
- Simple Queue Service (SQS)
- boto3, the AWS SDK for Python
The Nutshell Guide
Here are the basic steps for setting up SES for an application (Python, for the purposes of our demonstration):
- Create an AWS account.
- Create the SNS topic to receive feedback.
- Register email senders in SES.
- Create the SQS queue to receive email feedback.
- Write the Python code using the AWS SDK to send email and receive feedback.
The Step-by-Step Guide
Create an AWS Account
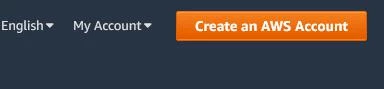
First, go to the Amazon AWS web site and set up an account. If your team already has an account, the account manager may need to create an invitation for you. To create your own account, for personal testing purposes for example, go to aws.amazon.com and click on the orange ‘Create an AWS Account’ button in the top right corner.
Once you have an account, you will be able to log into the AWS console. For example, on the SES page (aws.amazon.com/ses), click on the orange ‘Get started with Amazon SES’ button.
Create an SNS Topic
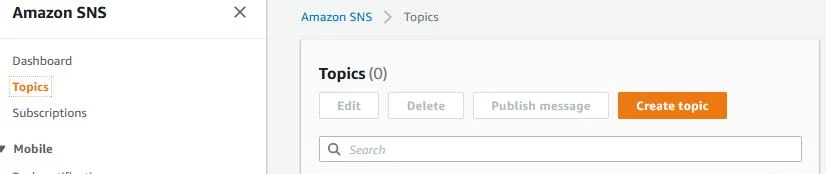
In the AWS console, select the SNS service from the ‘Services’ drop-down menu at the top of the screen (under the ‘Application Integration’ section). On the SNS Services page, select the ‘Topics’ tab on the left and select the orange ‘Create a topic’ button at the top right. Give your topic a descriptive name, for example: ‘My-Project-Send-Email-Feedback’.
Register in SES
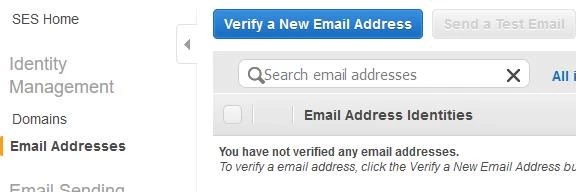
In the AWS console, select the SES service from the ‘Services’ drop-down menu at the top (under the ‘Consumer Engagement’ section). On the SES page, select the ‘Identity Management’ section in the middle of the page. On that page, select the ‘Email Addresses’ tab on the left. Then select the blue ‘Verify a New Email Address’ button at the top. The email address you add here will be sent a verification email.
To register a domain instead of an email, select the ‘Domains’ tab on the left and click the blue ‘Verify a new Domain’ button at the top. Amazon will generate DNS TXT records that need to be added to the domain DNS records so that it can verify that you do indeed own the domain.
Once the email (or domain) is verified (it will post a ‘Verified’ status in the list), link it to the SNS topic. Click on the email address in the list and then expand the ‘Notifications’ panel in the middle of the page. Click the ‘Edit Configuration’ button and set all notifications to use the SNS topic. The topic can be found in the ‘SNS Topic Configuration’ section in the middle. Then set ‘Email Feedback Forwarding’ to ‘Disabled’, at the bottom. (This is very important to avoid bounces, complaints and other feedback going to the email address instead of the topic!)
At this point, the SES service is in a sandbox and only the registered email address can send or receive emails. To leave the sandbox, you must send Amazon a request through the console. For now, we will continue using SES in its sandbox. Amazon provides several email addresses for testing purposes:
- To test delivery: success@simulator.amazonses.com
- To test bounce notifications: bounce@simulator.amazonses.com
- To test out-of-the-office notifications: ooto@simulator.amazonses.com
- To test a recipient complaint notification: complaint@simulator.amazonses.com
- To test a black-list notification: suppressionlist@simulator.amazonses.com
- To test a virus send refusal: attach a file with the following contents: X5O!P%@AP[4\PZX54(P^)7CC)7}$EICAR-STANDARD-ANTIVIRUS-TEST-FILE!$H+H*
Create an SQS Queue
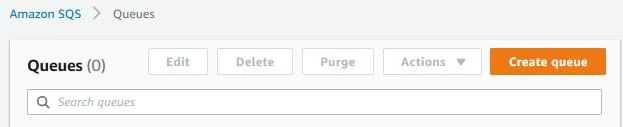
In the AWS console, select the SQS service from the ‘Services’ drop-down menu at the top (under the ‘Application Integration’ section). On that page, click the blue ‘Create New Queue’ button. Create a queue with a descriptive name, for example: ‘My-Project-Send-Email-Queue’.
You will have to link the queue to the SNS topic. To do this, select the queue by clicking on the check-box next to its name in the list. Once selected, click on the ‘Queue Actions’ button at the top and select ‘Subscribe Queue to SNS Topic’. Select the topic you created earlier.
Warning: There is a glaring issue with SNS/SQS linking. SNS topics can supposedly be linked to the SQS queue from the SNS page; however, I found that when linking this way, SNS notifications were not sent to the queue! This seems to be a bug in AWS. Linking from the SQS page does work, so that is what is documented here. Unfortunately, some AWS quick guides advise doing it the wrong way, which had me wasting a lot of time.
At this point, your AWS SES pipeline is ready. You can send email through SES and receive feedback on delivered emails, bounces, and other information through the SQS queue.
Python Code
Now, let’s talk about accessing SES with Python.
AWS SDK
To interact with Python code, you have to use the AWS SDK, i.e. the boto3 package. Install the package in the usual manner (pip, pipenv, etc). For example:
pipenv install boto3
AWS Python Client
To access AWS services, you will need the following:
- Credentials to access AWS.
- A session with AWS.
- A client specific to the AWS service.
The credentials are kept in a private file in your OS home folder. The path to this file should be something like: $HOME/.aws/credentials. You can give your credentials a name that can be used in the code. For example, your credentials file could look like this:
[profile-name-here]
aws_access_key_id = <AWS access key here>
aws_secret_access_key = <AWS secret access key here>
region=us-west-2
Once the AWS credentials profile name is known, use it to create a session in Python. From this session, create a client to access a service. The simplest way to code this in Python is as follows:
import boto3
session = boto3.Session(profile_name=‘profile-name-here’)
email_client = session.client(‘ses’)
queue_client = session.client(‘sqs’)
Send an Email
Sending an email is easy once you have an SES client. Just fill in a few dict with the required information, and call send_email(). For example, assuming you already created a client (as shown above), proceed as follows:
sender = ‘someone@somewhere.com’
recipient = ‘friend@house.com’
subject = ‘hi there!’
body_text = ‘bla bla’
body_html = ‘<H1>bla bla</H1>‘
charset = ‘UTF-8’
dest = { ‘ToAddresses’: [ recipient ] }
msg = {
    ‘Body’: {
        ‘Html’: { ‘Charset’: charset, ‘Data’: body_html },
        ‘Text’: { ‘Charset’: charset, ‘Data’: body_text },
    },
    ‘Subject’: { ‘Charset’: charset, ‘Data’: subject },
}

response = email_client.send_email(Destination = dest, Message = msg, Source = sender)
message_id = response[‘MessageId’]
Note: this example does not show any error handling.
Receive Email Feedback
Sending email is intrinsically asynchronous. The code above will return errors for issues that are immediately apparent, like wrong email address formats, but other errors, like bounces, only become known later. Even successful delivery is not immediately known. That is precisely why the SQS pipeline was set up. The code does need to know which SQS queue to use, i.e. the one that was created during the pipeline setup above. To receive SQS feedback, poll the SQS queue:
url_response = queue_client.get_queue_url(QueueName=‘your-SQS-queue-name’)
queue_url = url_response[‘QueueUrl’]
response = queue_client.receive_message(
    QueueUrl=queue_url,
    AttributeNames=[],
    MaxNumberOfMessages=1,
    MessageAttributeNames=[‘All’],
    VisibilityTimeout=0,
    WaitTimeSeconds=0)

if response and ‘Messages’ in response:
    message = response[‘Messages’][0]
    receipt_handle = message[‘ReceiptHandle’]
Note that the message received here is not the email message. The AWS SDK throws around the word “Message” a lot... in fact, the message has three levels of JSON-quoted-within-JSON to access the actual information about the email message! Here is the code to decode all these multi-level encoded JSON:
# The following code decodes sub-JSON embedded within text string within JSON…
# Note all the ‘Message’ entries within ‘Message’entries... confusing!
message = response[‘Messages’][0]
if message is not None:
    if ‘Body’ in message:
        body = json.loads(message[‘Body’])
        if ‘Message’ in body:
            msg = json.loads(body[‘Message’])
            body[‘Message’] = msg
        message[‘Body’] = body
Since the JSON feedback contains a lot of information, I will just concentrate on the parts that are most relevant to email feedback: message type and email address. The following is an excerpt of the JSON with just the relevant parts for a bounce notification:
{
    "Body": {
        "Type": "Notification",
        "Message": {
            "notificationType": "Bounce",
            "mail": {
                "source": "your-source-email-address@your-domain.com",
                "destination": [
                    "bounce@simulator.amazonses.com"
                ]
            }
        }
    }
}
Issues
There are a few things to look out for when using SDK to send emails. Here are some that we have flagged so far:
- As explained in the SQS/SNS section, you must subscribe to the SNS topic through the SQS page and not the other way around.
- The sender and recipient domain names need to be encoded using the punycode standard if they are in unicode.
- The sender and recipient email addresses need to be 7-bit ASCII.
- The friendly-name of the sender must be encoded using MIME encoded-word standard (RFC2047) if it contains unicode. For example: =?charset?encoding?encoded-text?=